General Installation Guidelines
Preparation
Ensure the surface is clean, dry, and free from debris before installation.
Tools Required
Depending on the product, you may need a drill, screwdriver, level, measuring tape, and masking tape.
Measuring & Marking
Carefully mark out your placement using a level and pencil before drilling to avoid misalignment.
Pre-Drilling
We strongly recommend not pre-drilling your joinery until you have received your handles to ensure precise placement.
Professional Installation
For best results, we recommend engaging a qualified tradesperson, particularly for recessed pulls and back-to-back fixing handles.
Installation Instructions
Cabinet & Appliance Pull Handles
Includes: Series 02 – Contour Handle; Series 03 – Slimline Handle, Series 03 – Bound Cabinet Pull, Cabinet Pull (no leather), Slim Profile Handle
Overview: Durable and timeless, these handles work across various cabinetry styles.
Fixing Guide
25mm fixings are supplied, suitable for cabinetry between 16-20mm thick. If your joinery exceeds 20mm, please contact us for alternative fixing options.
For added stability when installing appliance pulls, we recommend placing a washer behind the screw head. Washers are not supplied.
Installation Steps
Use a level to ensure accurate alignment and centre between fixings.
Ensure holes are drilled to accommodate the fixing screws.
Align and insert fixings through the joinery.
Tighten screws securely without over-torquing.
Entrance Handles
Includes: Series 02 – Stacked Entrance Pull; Series 03 – Bar Door Handle, Slim Profile Entrance
Overview: Entrance handles provide a bold statement and require precise installation.
Fixing Guide
Timber Door Fixings
| Material Size | Bolt Size |
|---|---|
| 32mm ⌀ | 8mm |
| 25mm ⌀ | 8mm |
| 19mm ⌀ | 8mm |
| 16mm ⌀ | 5mm |
| 14mm ⌀ | 5mm |
Metal Door Fixings
| Material Size | Bolt Size |
|---|---|
| 32mm ⌀ | 8mm |
| 25mm ⌀ | 8mm |
| 19mm ⌀ | 8mm |
| 16mm ⌀ | 5mm |
| 14mm ⌀ | 5mm |
Glass Door Fixings
| Material Size | Bolt Size |
|---|---|
| 32mm ⌀ | 12mm ⌀ |
| 25mm ⌀ | 12mm ⌀ |
| 19mm ⌀ | 12mm ⌀ |
| 16mm ⌀ | 10mm ⌀ |
| 14mm ⌀ | 10mm ⌀ |
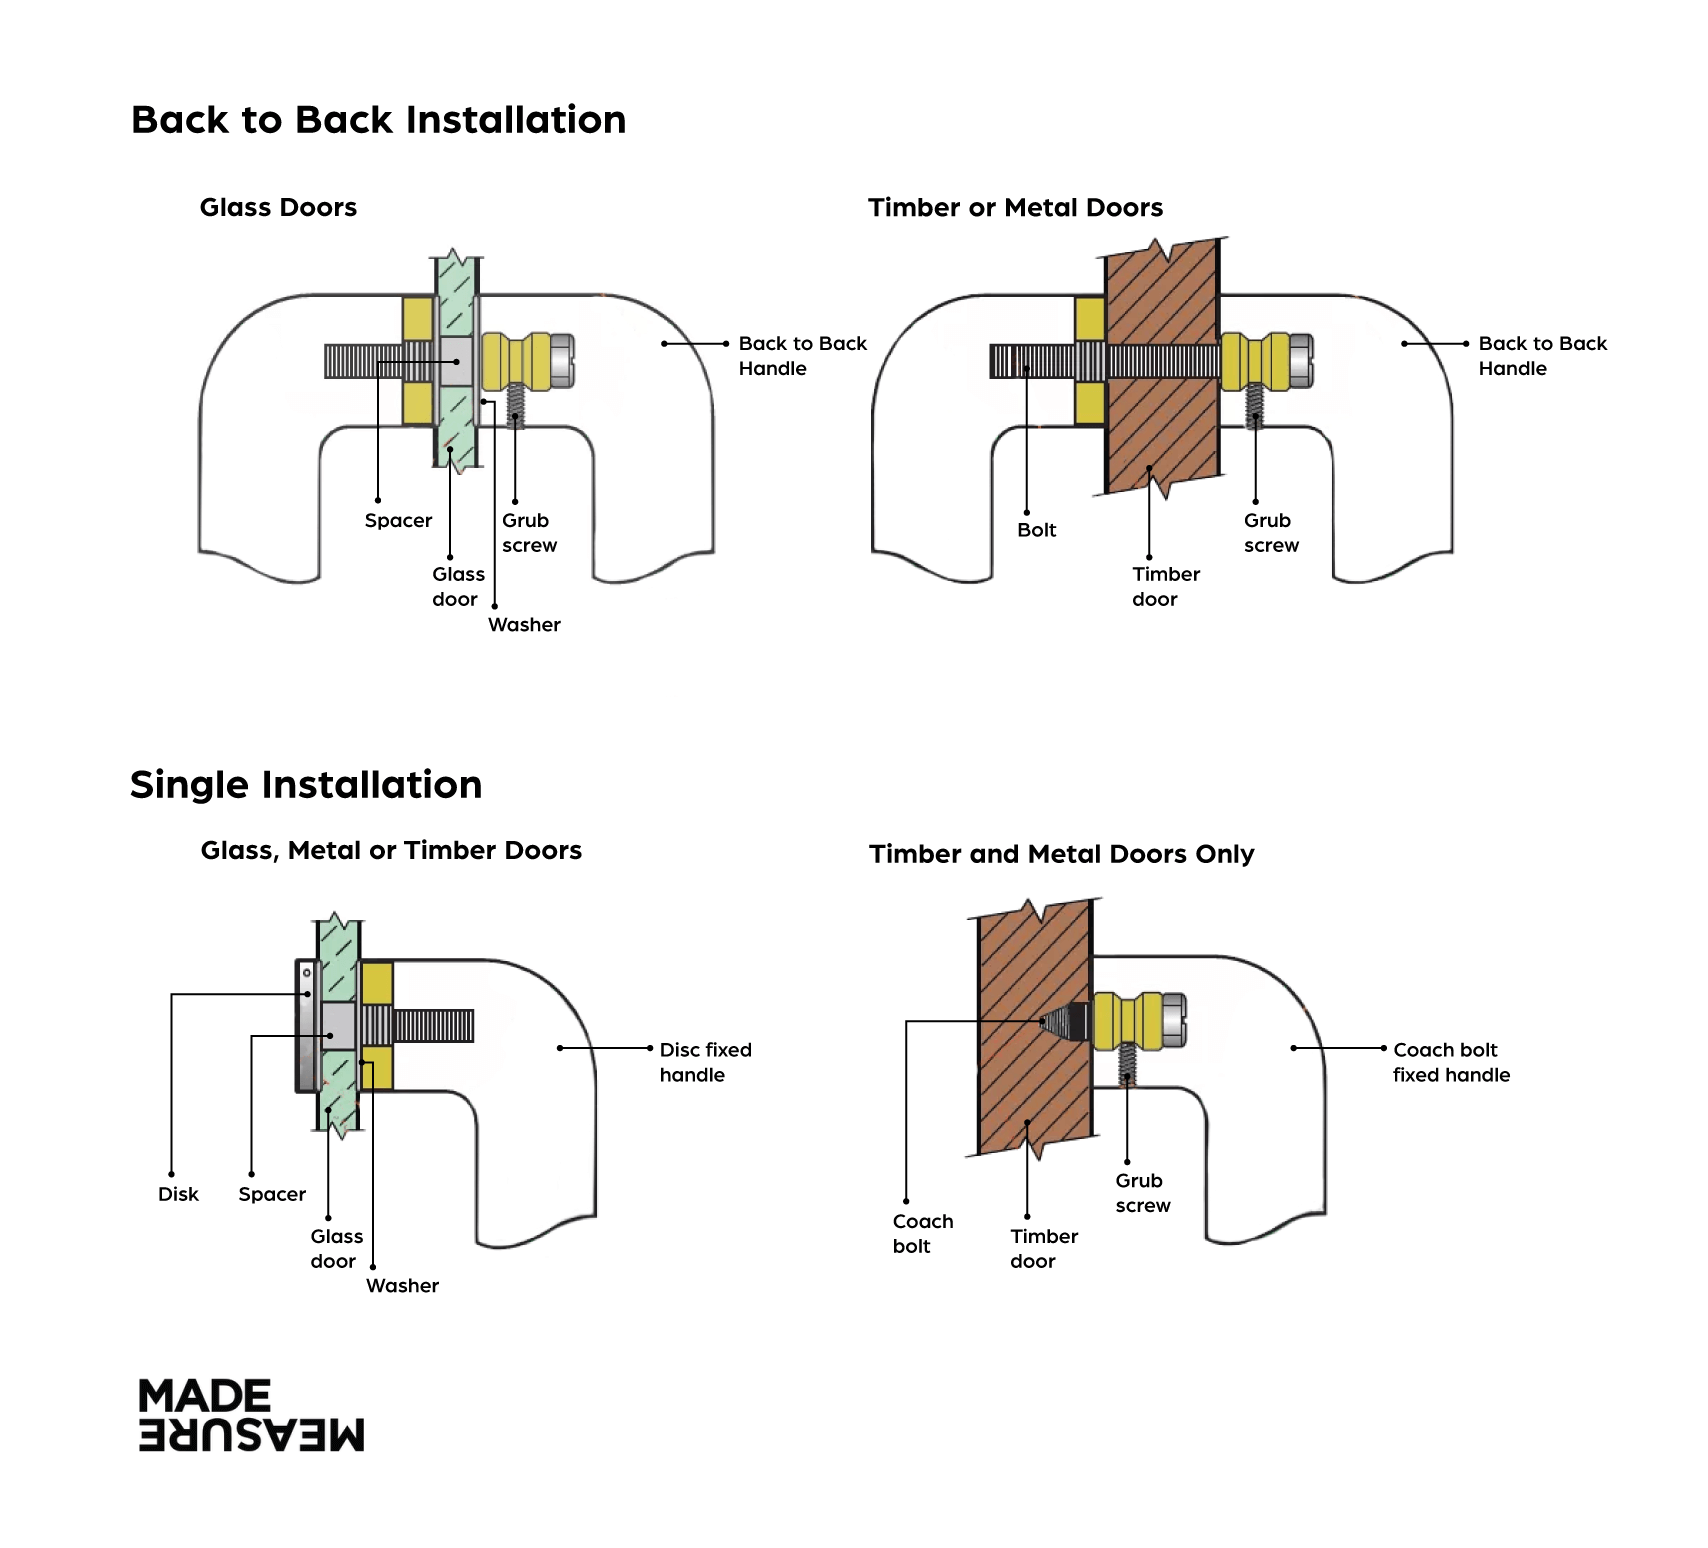
Installation Steps
Ensure symmetrical placement.
Create clearance holes for fixings.
Insert back-to-back fixings or standard fixings, depending on the model.
Ensure alignment before fully securing.
Leather Loops & Tabs
Includes: Series 01 – Leather Tab Short, Leather Tab Long, Leather Tab Wide, Leather Loop; Series 02 – Rounded Tab
Overview: Designed for simple yet refined functionality, these leather pulls are secured using single fixing points.
Fixing Guide
| Joinery Thickness | Interscrew Length | Extensions Needed |
|---|---|---|
| 16mm | 20mm* | None |
| 18mm | 20mm** | None |
| 20mm | 20mm | 1 x 5mm |
| 25mm | 20mm | 1 x 10mm |
| 30mm | 20mm | 1 x 5mm, 1 x 10mm |
| 35mm | 20mm | 2 x 10mm |
| 40mm | Please contact us | Please contact us |
*counter-sink at the back of cabinetry may be required if screw is slightly too short
**washer may be required inside cabinetry (not supplied)
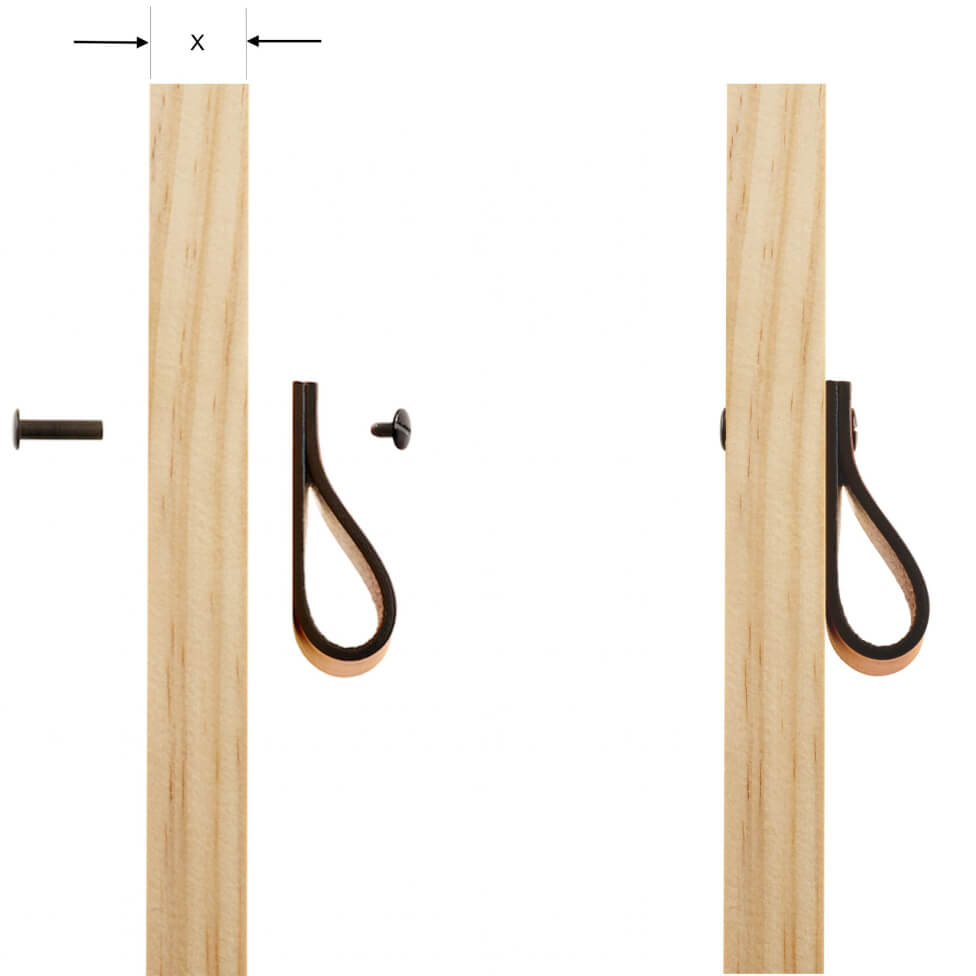
Installation Steps
Place the tab or loop at the desired location, factoring in its natural drop/length. Ensure the lowest point aligns with where you want to grip for ease of use.
Use a pencil to mark the screw hole location.
Drill a pilot hole using the appropriate drill bit size.
Insert the fixing screws through the joinery and tighten securely.
Ensure the leather is firmly in place but not overly compressed.
Leather Flat Handles
Includes: Series 01 – Leather Handle Single Fixing, Leather Handle Double Fixing; Series 02 – Rounded Leather Handle
Overview: These handles offer a sleek, streamlined look while maintaining the tactile warmth and flexibility of leather. Their adaptable nature allows you to determine the desired projection from your cabinetry, ensuring both comfort and functionality in use.
Fixing Guide
| Joinery Thickness | Interscrew Length | Extensions Needed |
|---|---|---|
| 16mm | 20mm* | None |
| 18mm | 20mm** | None |
| 20mm | 20mm | 1 x 5mm |
| 25mm | 20mm | 1 x 10mm |
| 30mm | 20mm | 1 x 5mm, 1 x 10mm |
| 35mm | 20mm | 2 x 10mm |
| 40mm | Please contact us | Please contact us |
*counter-sink at the back of cabinetry if screw is slightly too short
**washer may be required inside cabinetry (not supplied)

Installation Steps
Align the handle and mark screw hole positions, leaving enough slack to achieve your desired projection. Ensure there’s enough space behind the handle for a comfortable grip when pulling.
Ensure holes are drilled straight and to the correct size.
Insert screws through the joinery and into the handle.
Secure the handle firmly but avoid over-tightening.
Recessed Pulls
Includes: Series 03 – Recess Pulls
Overview: Recessed pulls require a precise rebate cut into the joinery for a flush fit.
Fixing Guide
Our recessed pulls are designed for cabinetry ranging from 16-20mm in thickness. If your project requires a different specification, please reach out to our team for guidance.
Each handle comes with 16mm flat-head countersunk screws for a secure, flush fit.
Installation Steps
Align the pull and mark out the recessed area.
Use a router or chisel for precision.
Insert fixings and tighten carefully.
Ensure the pull sits flush and is fully secure.
Shelf Brackets
Includes: Series 01 – Leather Shelf Bracket
Overview: Secure shelf brackets for proper weight distribution.
Fixing Guide
| Wall Type | Fixing Type |
|---|---|
| Solid Timber/Plaster | 20mm Screws (supplied) |
| Masonry/Brick | Wall Plugs & Screws (not supplied) |
| Drywall | Contact our team for recommendations |
Installation Steps
Ensure brackets are evenly spaced.
Ensure substrate is suitable for fixings, use appropriate wall plugs where necessary.
Fix screws firmly into place.
Position the shelf securely within the brackets.
Stacked Cabinet Pulls
Includes: Series 02 – Stacked Cabinet Pull
Overview: Designed for a bold, geometric effect, these pulls are secured using single fixing points.
Fixing Guide
Our standard fixings are designed for cabinetry with a thickness of 16-20mm. If your cabinetry falls outside this range, please contact our team to discuss alternative options.
Installation Steps
Ensure enough space around the diameter of the pull.
Check for precise alignment before securing.
Insert screws and tighten nut and washer carefully.
Ensure all elements are level and evenly spaced before fully tightening. Avoid overtightening to prevent damage to the hardware or surface.
Wall Hooks
Includes: Series 01 – Leather Full Hook, Leather Half Hook; Series 02 – Stacked Leather Hook, Valet hook
Overview: Functional and stylish, these hooks must be installed securely for weight-bearing capacity.
Fixing Guide
| Wall Type | Fixing Type |
|---|---|
| Solid Timber/Plaster | 20mm Screws (supplied) |
| Masonry/Brick | Wall Plugs & Screws (not supplied) |
| Drywall | Contact our team for recommendations |
Installation Steps
Use a level to ensure accurate positioning.
Necessary for drywall or non-solid surfaces.
Insert screws and tighten.
Ensure the hook is securely fixed before use.
Installation FAQs
The projection of the handle (how far it extends from the joinery) is up to you. Leather handles are flexible, allowing for different levels of projection depending on your preference. Some people prefer a flatter look, while others opt for a greater arch. Just ensure you leave enough room for a comfortable grip when positioning your handle.
Yes, all MadeMeasure products come with standard compatible fixings. Additional interscrews and extensions are available for purchase separately. Specialty fixings may need to be sourced independently.
Unlike regular threaded screws, MadeMeasure interscrews have a smooth post with a fixed length and are secured with a cap once installed. They offer a clean, seamless finish and are specifically designed for leather flat handles, tabs, and loops.
Yes, this is possible. However, we do not supply these, so you will need to source them separately if required.
Refer to our Fixing Guides for each product to ensure you select the correct length. When calculating, factor in your joinery thickness plus the leather handle, tab, or loop thickness. If additional length is required, interscrew extensions are available for purchase.
No. We strongly recommend waiting until your handles arrive before pre-drilling to ensure the most accurate placement. Leather thickness can vary slightly, so pre-drilling without the actual product in hand may lead to misalignment.
• Rear-fix handles are secured from the back of the cabinetry, meaning the fixing is hidden from view.
• Face-fix handles are mounted from the front, with no visible fixing at the rear of the door.
• Back-to-back handles are installed on both sides of a door, allowing for access from either direction. These are commonly used on entrance doors, large sliding doors, or pivot doors.
Recessed pulls require a precisely cut rebate or recess in the joinery to sit flush. We strongly recommend professional installation by a cabinet maker or joiner to ensure a perfect fit. Always have the handle in hand before cutting the recess, as slight variations in thickness can occur.
No. Leather is a natural material that is not suited to outdoor exposure, as moisture, UV light, and temperature fluctuations can cause it to degrade over time. If you require a durable outdoor option, we offer solid metal hardware designed to withstand the elements. Contact our team for recommendations.